Tuesday, December 10, 2013

Chocolate Strawberry Nutella Cake


Ingredients:

  • FOR THE CAKE:
  • 2 sticks Butter
  • 4 Tablespoons (heaping) Cocoa Powder
  • 1 cup Boiling Water
  • 2 cups Flour
  • 2 cups Sugar
  • 1/4 teaspoon Salt
  • 1/2 cup Buttermilk
  • 2 whole Eggs
  • 1 teaspoon Baking Soda
  • 1 teaspoon Vanilla
  • 1-1/2 cup Nutella
  • FOR THE STRAWBERRIES:
  • 2 pints Strawberries, Hulled And Sliced
  • 1/4 cup Sugar
  • 1 teaspoon Vanilla
  • FOR THE WHIPPED CREAM:
  • 2 cups Heavy Cream
  • 1/2 cup Powdered Sugar


Somewhere people know how to give compliments


The Problem With Processed Food


the problem with processed food thesproutingseed.com
Processed Food.It’s getting a bad rap. It’s almost becoming a bad word. And yet Americans spend more grocery money on it than any other food item (source). So what gives? Everybody seems to be concerned about health these days, so why are processed foods still filling our cupboards and making up 70% of our diet (source)?

A Backstory

I studied Nutritional Science in college and part of my degree focused on food science, and specifically the components of food processing. The major take away from these classes was this:
Money doesn’t grow on trees, it grows in packaging and boxes.

What do I mean?

Well, take an apple, for instance. An apple can only yield so much money when sold to a consumer. Any ol’ apple farmer can sell his apple crop. Some apples may be more expensive than others due to type or how it was grown (i.e. conventional v. organic, etc.), but other than that, there isn’t much difference. An apple can’t be branded and it isn’t really marketable. Farmer Bob can’t patent the apple and make way more money than farmer Joe.
But, let’s say Industry Fred purchases Farmer Joe’s apples…all of them. Farmer Joe sells them at a lower price because Industry Fred is buying them all. Industry Fred then uses some wheat, corn and soy (subsidized by the government so it’s extra cheap!) to make an apple and grain snack bar. He puts it in fancy packaging and creates really catchy commercials about them on TV. He’s able to sell this product for way more than it cost him to make.
It’s capitalism. It isn’t wrong, but it gets to be a problem for our health when our food system is market driven. (BTW, I am not an economist and how no solutions for this.)

Do Processed Foods Have Any Benefit?

One could argue foods have been processed for a really long time. Fermentation is one example of an ancient and beneficial type of food processing. The act of fermentation increases enzymes and probiotics in food. It’s super great for our bodies and it’s tasty too!
After WWII and the space race, highly processed foods as we know them today (canned, frozen, dehydrated, packaged foods full of chemicals and additives) skyrocketed in popularity. These foods have enabled people to get out of the kitchen. With more free time, women have been able to pursue other interests outside of the home and positively contribute to society in new ways. Processed foods are inexpensive and often filling. These foods have given extra time to a lot of people, jobs to a lot of people and fed mouths with a lot of bang for the buck. They’ve also made the food industry wealthy and uber powerful in our country (I wouldn’t say that’s a benefit, though).
These benefits have come at great cost.

How Are Processed Foods Detrimental To Our Health?

Let’s be clear. I am not talking about minimally processed foods like wine, fermented foods ,etc. I am talking about highly processed foods–foods that you can’t make in your kitchen at home. These processed foods are usually a bunch of extremely inexpensive ingredients with lots of additives thrown together to make an appetizing, marketable and memorable food. This is great for business, but what about the one who eats it? Vitamins and enzymes are destroyed in the processing of foods. These foods are lacking in the nutrients our bodies need to thrive and they are often full of toxic ingredients. I believe processed foods are extremely harmful to our health and are the cause of MANY illnesses.
Highly processed foods are full of:
Coloring Agents (for more on why food coloring is bad, go here)
Preservatives
Pesticides
Trans-fats
Sodium-chloride (Is salt really bad for you? Here is the difference between sea salt and commercial salt)
GMOs (go here and here)
Unhealthy Vegetable Oils (check out the ugly truth about vegetable oils here )
Polyunsaturated fatty acids (go here to read about PUFAs)

How To Avoid Unhealthy Processed Foods

  • Avoid the packed foods high in sodium
  • Stay away from canned foods high in fat and sodium
  • Stick to real foods (check out my post here on “What Are Real Foods?”)
  • Shop the perimeter of the grocery store. That’s where you will find the freshest, most whole foods available
  • Make time to plan your meals and prepare them
  • Eat foods with ingredients you can pronounce
  • Choose whole grains instead of refined flour ingredients
  • Eat more foods that don’t come with labels, packages, or advertising
  • Avoid fast food…avoid it like the plague
  • Say no to sugar breakfast cereals
  • Packaged cakes and cookies are a no-no
  • Frozen veggies and fruits are ok. Be sure to read the ingredients and purchase the ones with no added sugars, fats or flavorings. 

So, why are processed foods filling our cupboards?

I hate to reduce it to this, but it comes down to money. The food industry has tons of money, therefore they have a lot of power. This power speaks through advertising, government policies, what is on the shelf at the grocery store. All of this influences our purchases. (Example, McDonald’s advertising to kids, therefore kids want cheeseburgers) It also comes down to time. People are super busy these days and don’t have the time to cook. Processed foods are inexpensive, convenient and filling. And finally, it boils down to taste. Processed foods are full of fat, sugar and salt and gosh darnit they are tasty and addicting. Money may be tight in a household and the tempation to buy processed foods alluring, however, with some planning and commitment processed foods can be avoided.
For healthy snacks and real food resources, go here.
For an interesting talk on how processed foods took over the American diet, check out Diane Rehm’s interview on NPR. I just love her!
PAID ENDORSEMENT DISCLOSURE: In order for me to support my blogging activities, I may receive monetary compensation or other types of remuneration for my endorsement, recommendation, testimonial and/or link to any products or services from this blog.

For the Love of Coffee

When I was a sophomore in college at Liberty University, I started drinking coffee for the first time. Before then, I would occasionally drink the fancy drinks like consisting of solely sugary frappucinos. But once the reality of college set in, the research papers, intense finals, and hours of homework taking place in the middle of the night, I adapted my taste buds to the beautiful thing that is COFFEE. I’ve come a long way and can drink it any way you give it to me now, with the exception of black, because let’s be honest…I’ve got nothing to prove.
With that being said, when we bought our house, the very first thing I got finished as far as home projects go, was our brand spanking new COFFEE STATION! I got my inspiration via Pinterest (because who is creative on their own anymore?) and made this dream a reality.
My friend Chelsea and I painted the wall behind it a nice mocha accent color, and my handy-man father-in-law installed an outlet behind the cabinet. After that we were ready to put everything together!
keurig
My sweet grandmother got us the Keurig as our housewarming gift and I started picking up all the other pieces of the station a little bit at a time!
coffee station
The wire shelf, the underneath baskets, and the decor came from the wonderful world of Hobby Lobby. The table came from Home Goods, and the canisters were found at IKEA! I absolutely LOVE how it turned out, and it was definitely worth the investment because we use it Every. Single. Day. I love how it completes our kitchen and acts as a nice transition area between the breakfast area and the living room. Perfect for easy access to coffee in the morning, and a nice cup of tea for lounging on the couch at night! If you’re thinking of creating a coffee station in your home, I highly recommend it! It’s probably going to be in every home of ours from now on. Mmmm….coffee :)

5 Mouth Watering Pumpkin Seed Recipes


I love love love roasted pumpkin seeds, so I’m super excited to share these Rachael Ray roasted pumpkin seed recipes with you!

Ingredients

1 cup cleaned, raw whole pumpkin seeds
1 tablespoon, plus 1 teaspoon fine sea salt
1 teaspoon olive oil

Directions

Preheat oven to 375. Brin 4 cups of water, plus the seeds and tablespoon salt, to a boil in a small saucepan. Simmer for 10 minutes. Drain, then pat dry with paper towels.
Toss the seeds with the olive oil and remaining salt. Spread into a single layer onto a greased and foil-lined baking sheet.
Roast 10-12 minutes or until golden. Toss with seasonings (listed below) and roast for 5 more minutes.

Seasonings

Zesty
1 teaspoon garlic powder
1 teaspoon onion powder
1 teaspoon sugar
pinch of cayenne
1 teaspoon worcestershire sauce
BBQ
2 tablespoons brown sugar
1 teaspoon chile powder
1 teaspoon garlic powder
1 teaspoon onion powder
1/4 teaspoon smoked paprika
pinch of cayenne
Cheesy
2 teaspoons grated parmesan
1 teaspoon onion powder
pinch of cayenne
Cinnamon Sugar
1 1/2 tablespoons sugar
2 teaspoons ground cinnamon
1/2 teaspoon ground nutmeg
Sesame
2 tablespoons sesame oil instead of the olive oil above
2 1/2 tablespoons sugar
1 tablespoon toasted sesame seeds
2 teaspoon ground ginger
pinch of cayenne


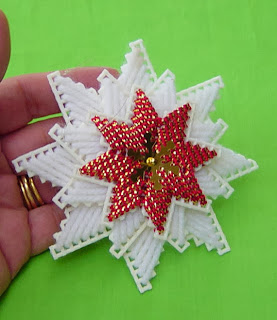
Vintage Snowflake Needlepoint Plastic Canvas Christmas Ornament

This is a vintage snowflake needlepoint plastic canvas Christmas ornament. It has red & gold metallic yarn in the middle. It has a gold color snowflake shaped sequin in the center. It has a slight stain on the back that is showing slightly on the front. It measures 4" in diameter.


This is a vintage snowflake needlepoint plastic canvas Christmas ornament. It has red & gold metallic yarn in the middle. It has a gold color snowflake shaped sequin in the center. It has a slight stain on the back that is showing slightly on the front. It measures 4" in diameter.


Plastic Canvas Table Runner

Plastic Canvas Table Runner

runner1
runner2
Simple circles done in any colour will  make a wonderful pop of colour  and visual interest. You can make them to fit any table you have.


Plastic Canvas Letters - Guest Post from SugarTart Crafts

I am very excited to have Toni from SugarTart Crafts here today to share a wonderful sewing activity for kids. I must admit sewing is a bit out of my comfort zone but this activity is easy enough for even a  child to do. I enjoy reading Toni's blog because she has great ideas for food, crafts, and kids fun.


Hi there Mess for Less Readers. I'm so happy to be visiting you today!

My name is Toni, and I blog over at SugarTart Crafts where I focus mostly on sewing projects for my 2 year old daughter and our newest addition (on the way).


I have to admit, that while I was completely honored that Vicky asked me to share something with all of you, it was a bit difficult to switch gears from my recent "all baby all the time!" mentality. But eventually I remembered one of my favorite things to do as a little kid, and knew exactly what I wanted to write about.


Plastic Canvas! 
Did anyone else ever play with it as a kid? 
My Gramma would often hand me a sheet of canvas, some scissors, and a bag of yarn. 
Then I would sit on the sofa and remain miraculously silent for hours at a time. 
What Mom doesn't dream of that kind of response to a craft?

The amount of "parental involvement" in this project varies greatly depending on the age of your child,
but can easily entertain most kids between the ages of 4 and 10. 


Supplies:
Scissors, Yarn, Sheets of plastic canvas 
(It comes in a variety of colors, and can be found at any craft, fabric, or wal-mart type store.)


A blunt needle
These come in metal or plastic, but make sure that the eye of the needle is not too large to fit
through the holes of the canvas. The 5mm worked perfectly. (I learned the hard way!)  

Optional:
Magnets, Glue, Felt, and Graph paper


Cut out your desired shape.
You can use the graph paper to help your child design their own.


Use the yarn to make diagonal stitches from the bottom left to the upper right. 


The yarn "tail" can be secured behind the first few stitches.


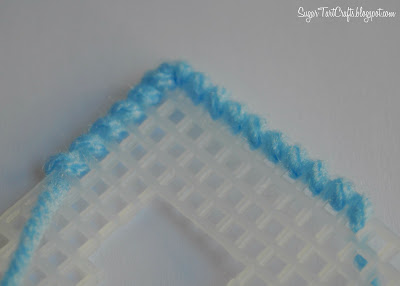
Once all the rows are filled with diagonals, wrap the yarn around the edges,
and hide the ends under the stitches on the back. 

Now you can glue on a some felt to make the back prettier,


  add some magnets and stick them to the fridge,


or string a few together for a garland.

And in case you need a little extra inspiration, here are a few alphabet printables!


Just click on one of the 3 boxes to get started.
These letters are roughly 3 inches tall by 2 inches wide, and don't worry, they'll print in grey so you can really see the grids, and it won't use up all your ink.


source: http://www.messforless.net/2012/03/plastic-canvas-letters-guest-post-from.html


Earring Display Plastic Canvas


I’d like to thank everyone who commented on, and pinned my Upcycled Kleenex box post last week.  My blog is very new and I appreciate the support!  You can help me grow even more by becoming a follower on the right.
Isn’t this the perfect way to display your favorite earrings? Way-back-when, I saw something similar in a magazine (maybe BHG), using a picture frame with burlap to hang the earrings.  Since then I’ve seen MANY variations on Pinterest.  I had filed this away in my “Going to Make Someday” file.  The photo above is one of the more recent variations I’ve made.
Because I’m so busy and don’t have time to plan in advance (OK – maybe at times I procrastinate), I realized as I was leaving work the day before my children’s Christmas parties at school, that I didn’t have Christmas gifts for their teachers.  GULP!!  One of the girls had activities that night (probably dance), and I knew I wasn’t going to have time to shop for anything (and, I really like to make unique gifts for the teachers).  What to do, what to do?
I scanned the “Going to Make Someday” file in my mind (storing it there saves paper), and thought of these.  Then I went work thinking about how I would modify them, and what I could use as a material to hang the earrings.  After two quick stops at Hobby Lobby and Dollar General (both on my way home – convenient huh?),  I had all the supplies I needed.  Here’s the supply list I came up with:
  • Mod Podge – have at home
  • glue gun & glue sticks – have at home
  • tulle fabric to use as a hanger – have at home
  • pretty scrapbook paper – purchased at Hobby Lobby (on sale that week – yay!)
  • plastic canvas (for needle point) – also purchased at Hobby Lobby
  • picture frames – $2 each at Dollar General
This is one of the first versions I made (this one hangs in my bedroom).

This is how I put it together:
Remove the glass and all backing from the picture frames – the frames I bought had cardboard backing all around the back that I had to tear off (and remove staples).
Decorate or paint your frame.  Originally, I used strips of scrap-book paper decoupaged to the frame.
I’m very impatient to finish once I start a project; in the past I’ve been guilty of using too much Mod Podge when decoupaging and either creating bubbles under the paper or turning the paper to mush.  It’s taken me years to develop my decoupage technique (that I’m sure a more patient person got right the first time).
To avoid bubbles under the paper when decoupaging, I spread a thin layer of Mod Podge over the entire surface I’m covering. I carefully spread the paper over the decoupaged area and push out any bubbles then I let it dry for a few minutes (doesn’t take long to dry).  Next I spread a very thin layer of Mod Podge over the entire paper and let that dry for a few minutes (again, it doesn’t take long to dry – check your email while you wait).  Once that layer has dried, I spread several more layers (using the same spread and let dry technique).     
I like to finish anything I’ve decoupaged with a thin layer or two of varnish.

Cut the plastic canvas to fit the photo opening, place in the photo opening, and hot glue.
The first several I made, were not very nicely finished on the back because the glue oozed through the grid of the canvas.  Since you don’t see the back, that’s really not a problem, unless you are a crazy like me and like to have a nicely finished product (front and back).
Now, when I make these I use jute (as I’ve mentioned I have a VERY large roll that I purchased for a previous project) pressed into the hot glue (as I’m gluing).  It gives the back a more finished look, helps adhere the canvas to the frame, and you can leave it long enough to make a hanger with the jute.

If I’ve decoupaged or painted the back of the frame, I skip this step, but if the back of the frame looks unfinished (if it had staples or glue), then I cover it with felt.

I just love these earring displays, they are the perfect storage solution (especially for me since the surface of my dresser used to be covered in mismatched earrings). I’ve let my imagination run wild when decorating these…   Check out some of my more recent creations.
This is decoupaged front and back with tissue paper, then varnished for shine; it hangs on the wall.

This is a smaller version.  The frame is an unfinished frame from Michael’s with the dowel stand in the back, so it sit’s on the table top.  It’s also decoupaged with tissue paper; I added the flowers by nailing them to the frame with upholstery tacks. Cute for a little girl!

And, finally something a little different; no decoupage.  I used some shells that we’ve collected, and some smaller shells that I bought on clearance many years ago (don’t even remember where), all carefully arranged and painstakingly glued to the frame (that took a while).


I hope your inspired to make your own earring display.  If you have made one, or if you do, I would love for you to share!!
Do you have any other ideas for cute framed earring displays?
Happy creating!


source: http://southernflaircrafts.wordpress.com/2012/06/18/earring-display/